Printus works off of the PrintNode API to provide you with industry leading reliability for cloud printing. To get started you need to signup for a PrintNode account, download the PrintNode client to your computer and ensure that the printer you wish to use is connected to your computer. In this guide I’ll go over what you need to do to get up and running with Printus + PrintNode.
Ensure that your Printer is connected and setup on your Computer #
For Printus to even be able to work, you need to have a printer connected to your computer. This can be pretty much any Printer; as long as this printer can print documents from your computer, then Printus will be able to send print jobs to it.
Create a PrintNode account #
Head over to printnode.com and click the Sign Up button to begin the signup process. Once you’re signed up to PrintNode, you will automatically get a free trial of their “Essential Plan”.
This plan costs $9USD/month with 5000 cloud printing jobs and 3 Connections (i.e computers performing the prints)
PrintNode does provide a FREE plan that gives you 50 cloud printing jobs a month and 1 connection (i.e computer performing the prints). You can see detailed pricing for PrintNode here: PrintNode Pricing
Note that PrintNode pricing is totally separate from Printus’ pricing.
Download and install the PrintNode Client #
You need to install the client on the computer that will be performing the prints. Obvious, this is a computer that you will have turned on during the hours that you expect printing to happen. If you’re a restaurant, this might be the same computer that runs your POS software, so that online order prints can come in even while you take walk-in orders.
The PrintNode client supports the major Operating Systems: Windows, MacOS and Linux. If you’re technically inclined, you can bypass the need to keep a desktop computer/laptop turned on to receive the print jobs, by instead making use of a Raspberry Pi which is a low power device.
You can download the PrintNode client for your operating system of choice here: Download PrintNode
You can read install instructions here: Installing PrintNode
Sign into your PrintNode account #
Once you’ve installed the PrintNode client, you need to sign into it using your PrintNode credentials. These are the same credentials you used to sign up to the PrintNode website.
Check if your Printer shows in on your PrintNode account #
PrintNode will sync your connected printers with their online interface, ensure that your printer shows up inside the PrintNode.com dashboard by going to PrintNode Dashboard->Devices
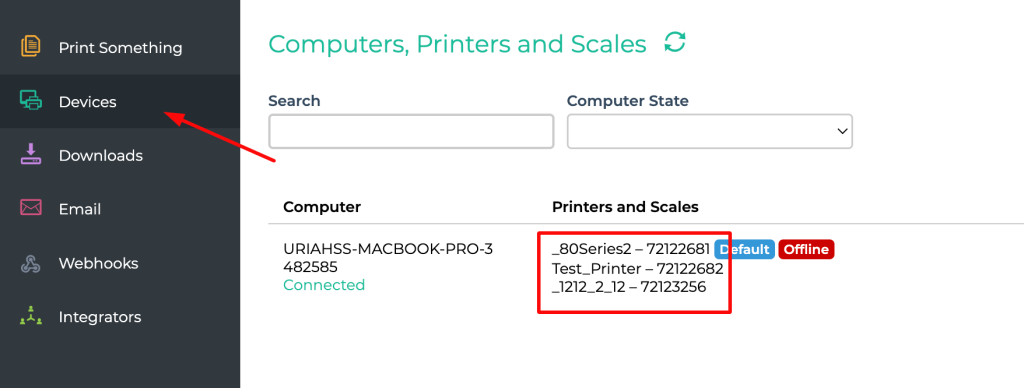
You can click the refresh icon if you don’t see the printer listed yet. If you do not see any printers, and you think that you’ve setup everything correctly with the PrintNode client, then reach out to the PrintNode support.
If your printer shows then go to the “Print Something” tab to attempt a test print.
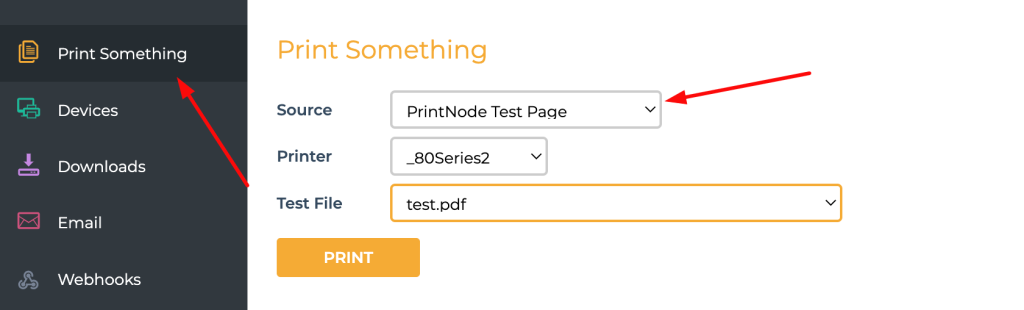
You can choose to upload a custom file to test print or simply change the option for Source to “PrintNode Test Page” and then select the test file. There are a bunch of test files and depending on your printer they might show up correctly when printed- this doesn’t matter, all that matters is that the print actually went through and that Printus will also be able to send print jobs.
Completing the Setup #
Now that you know PrintNode works fine, you need to get your PrintNode API key and add it to Printus. For more detailed instructions on this, please see this guide: Getting Your PrintNode API Key


